How to improve performance in webpack

As the front-end side is becoming bigger and more complex, sometimes we have to face to the issue of performance. Briefly, we hope the users will experience our web app as faster as possible. This is about to minimize the request files size and optimize the request order. Let's have a look at how could we do this in webpack.
1. Tree Shaking
As the naming, tree shaking will shake the useless modules even it's claimed in some other files. This will decrease bundle size.
Let's say I have two functions in math.js file:
export const add = (a, b) => {
	console.log( a + b );
}

export const minus = (a, b) => {
	console.log( a - b );
}
And I only import the add function like this:
import { add } from './math.js';
add(1, 2);
Note: webpack tree shaking only supports the es6 module
import, but doesn't support commonJSrequire, as the es6importunderlying implementation is static butrequiresis dynamic.
If I have no tree shaking feature here, the bundle will also include the minus function code, which is useless and raise the bundle size.
How do we config tree shaking in webpack?
On development mode:
If you need to config for dev mode, make sure you add usedExports within optimization property in your webpack.config.js file like this:
optimization: {
    usedExports: true
}
And, in package.json you should add one line just for future convenience:
"sideEffect": []
With this
sideEffect, you can add whatever you will let webpack ignores when tree shaking. E.g. you need toimport '@babel/polly-fill'in your entry file to do polly-fill job. As you don't use anything of this polly-fill module here, webpack will shake the whole babel/polly-fill module which is not you expect. In this case, you can add this module into thesideEffectarray:"sideEffect": ["@babel/polly-fill"]. Another common example is forimport './style.css'and"sideEffect": ["*.css"].
However, if you run webpack to bundle, you will find the output file still includes the useless minus function but one extra comment before it to tell you "exports provided: add, minus" and "exports used: add". The reason is that webpack considers remove these tree shaking modules might cause error when you use source map. So in development mode, webpack won't really remove the tree shaking modules code.
On production mode:
Nothing need you to do! Webpack will do it for you by default. Just don't forget to add "sideEffect": [] in your package.json file and add something you prevent from tree shaking.
2. Code splitting and lazy loading
I think almost most front-end developers used some utility library like lodash, jquery or ramda. The thing is when a file imports these libraries and use webpack to do the bundling job, the whole bundle size would be pretty big as all these 3rd party libraries are also included in the bundle file. This is not we want!
Let's say you are using lodash in index.js , and you can create another file called lodash.js to do this:
import _ from 'lodash';
window._ = _;
And add it as an extra entry file like this:
entry: {
    lodash: './src/lodash.js',
    main: './src/index.js'
}
With this solution, the bundled index.html will import lodash.js as another <script> file. The benefit is that we split business logic code and vendor code in two different files. When the user reload new code, the lodash.js already cached in browser, and this will speed up user experience.
Don't forget to use [contentHash] as part of your output files naming, especially in production environment, to prevent caching of browser when code content already changed.
This concept is code splitting and doesn't matter with webpack. With webpack we can do it easily and simply.
Just do this in webpack.config.js` file:
optimization: {
    splitChunks: {
        chunks: 'all'
    }
}
Then you will find webpack does the code splitting for you: you will get one extra bundle file: vendors~main.js which includes the imported libraries.
For more configurations of splitChunks plugin of webpack, you can read its official documents
Actually, lazy loading can't leave code splitting. Image following code:
const getComponent = () => {
  return import('lodash').then(({ default: _ }) => {
    const element = document.createElement('div');
    element.innerHTML = _.join(['Lux', 'Liu'], '-');
    return element;
  });
};

document.addEventListener('click', () => {
  getComponent().then((element) => {
    document.body.appendChild(element);
  });
});
And use webpack to bundle project, you should find lodash is bundled in vendors~*.js and the top code is bundled in main.js. Inspect bundled landing page index.html in your browser and open network, you will find only index.html and main.js are requested when you load index.html. Once you click the page, you will see "Lux-Liu" on your page and the vendors~*.js is just requested after you click the page. This is lazy loading and obviously, it will speed up the UX.
Don't forget to use polly-fill or @babel/plug-syntax-dynamic-import plugin for this experimental syntax.
Do you remember we have a configuration for code splitting?
optimization: {
    splitChunks: {
        chunks: 'all'
    }
}
If you have no this configuration, webpack will still do code splitting for you, but only the dynamic import.
Have a look at the default config of splitChunk plugin:
module.exports = {
  //...
  optimization: {
    splitChunks: {
      chunks: 'async',
      minSize: 30000,
      minRemainingSize: 0,
      maxSize: 0,
      minChunks: 1,
      maxAsyncRequests: 6,
      maxInitialRequests: 4,
      automaticNameDelimiter: '~',
      cacheGroups: {
        defaultVendors: {
          test: /[\\/]node_modules[\\/]/,
          priority: -10
        },
        default: {
          minChunks: 2,
          priority: -20,
          reuseExistingChunk: true
        }
      }
    }
  }
};
By default, the chunks has a async value, which indicates webpack encourage us to use this lazy loading/dynamic import.
3. Bundle analyse, preloading and prefetching
In the real practice, we usually use webpack analyse to do the bundle analysis job.
The process is pretty straight forward and simple:
- Run
webpack --profile --json > stats.json, which also can be combined in your build script, like"dev-build": "webpack --profile --json > stats.json --config <your_conf_file_path>"; - Then you will get one
stats.jsonfile in the root directory; - Use it on http://webpack.github.io/analyse/. Webpack will tell you everything about this bundling, especially the chunks and modules dependency relationships;
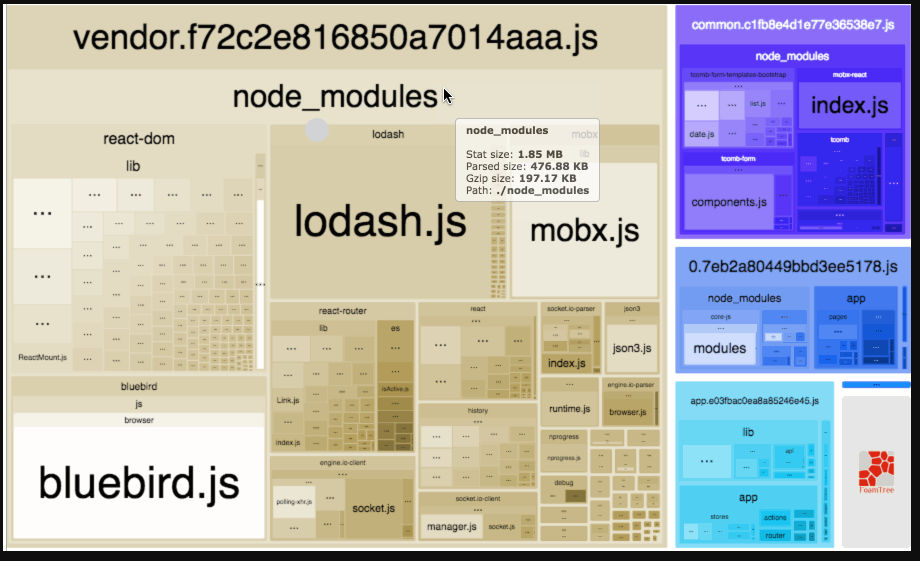
This is the official analyse tool, you also have some other options. Personally, I prefer webpack bundle analyzer, which will give a clear and intuitional map like this:
Now, let's back to the previous example:
const getComponent = () => {
  return import('lodash').then(({ default: _ }) => {
    const element = document.createElement('div');
    element.innerHTML = _.join(['Lux', 'Liu'], '-');
    return element;
  });
};

document.addEventListener('click', () => {
  getComponent().then((element) => {
    document.body.appendChild(element);
  });
});
Normally, when we define a click event we will write like this instead of the top one in the index.js file:
document.addEventListener('click', () => {
   const element = document.createElement('div');
   element.innerHTML = _.join(['Lux', 'Liu'], '-');
   document.body.appendChild(element);
});
It's pretty simple and good enough, right? Is there any place to optimize?
Bundle this app and inspect index.html in browser, for chrome, open the dev tool. Press ctrl+shift+P, and input coverage then choose show coverage, you should get a new dev window open similar with this:
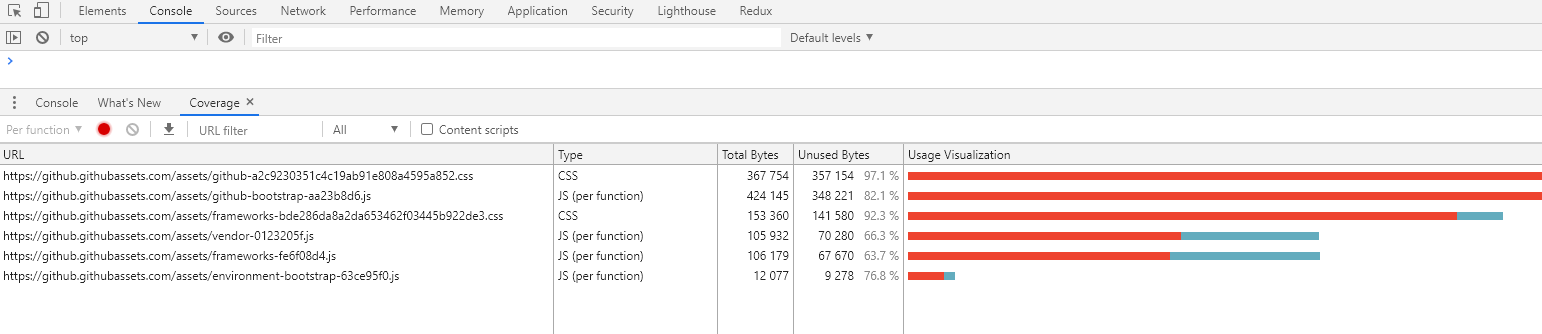
This coverage window tells you how much the code is used on this page for all requested files right now. The red bar is unused part and blue bar is used part on this page. If we wanna improve performance, we should minimize the red part.
How to do this in our code?
The main idea is to use dynamic/async import to split unused logic:
-
create a
click.jsfile:const handleClick = () => { const element = document.createElement('div'); element.innerHTML = 'Lux Liu'; document.body.appendChild(element); } export default handleClick; -
Dynamically import and use it in
index.jsfile:document.addEventListener('click', () => { import('./click.js').then(({default: func})=>{ func(); }) });
Obviously, webpack will split the async import code in different file. This means we implement the lazy loading, and the coverage of main.js will increase as the logic code decreases. Finally, the performance will be improved. That's why I said webpack encourages developers to write more dynamic import code.
However, we still have a problem: let's say we use this approach to implement an app which has a sign in/sign up popup modal. With this approach, this modal module won't be requested on the landing page until the user clicks a button to tell modal to popup.
The question is: how would we handle the gap issue between click and modal module request finishes?
The ideal solution for this problem should be like this: when the landing page code files requests finish, and the network resource is released, could we let browser request the sign in/sign up modal code file quietly?
Prefetching/Preloading can do this for us.
It's very straight forward: add a magic comment when you import the splitting module:
document.addEventListener('click', () => {
   import(/* webpackPrefetch: true */ './click.js').then(({default: func})=>{
       func();
   })
});
A preloaded chunk starts loading in parallel to the parent chunk. A prefetched chunk starts after the parent chunk finishes loading
Personally I prefer prefetch than preload.
4. Code coverage > caching
Usually when we talk about the performance of a web app, we are not talking the caching but the first UX performance, which means we are talking the bundle size and files request order.